Team:Hong Kong JSS/Experiments
<!DOCTYPE html>
Team:Hong Kong JSS/Experiments

Hong Kong JSS
Experiments
Experiment 1: Validating the AFB1 Testing Kit with Aspergillus flavus samples
Aim
To validate if the AFB1 testing kit can measure the AFB1.
Materials and Equipments
Extraction of AFB1 from A. flavus
Procedures for solid (liquid) food samples
Different results for the testing kit

Positive: Only the reddish-purple control line appears, indicating that the food sample is equal to or more than 20 ppb (ng/ml) AFB1 concentration.
Negative: Both the reddish-purple control line and testing line appear simultaneously, indicating that the food sample has less than 20 ppb (ng/ml) AFB1 concentration or even no AFB1.
Invalid: Only a reddish-purple testing line appears, or neither the control line nor the testing line appears.
Precautions


Validating the testing kit

To validate if the AFB1 testing kit can measure the AFB1.
Materials and Equipments
- A. flavus grew on potato agar
- AFB1 Testing Kit (Fender Biotech)
Extraction of AFB1 from A. flavus
- 20 mL of distilled water was added to the potato agar with A. flavus
- Wait for 10 minutes, the AFB1 will be dissolved into the water
Procedures for solid (liquid) food samples
- 100 uL of the extracted solution was transferred to the tube containing the extraction agent with the sampling spoon provided from the testing kit.
- The tube was screwed tight and vortexed thoroughly for 1 minute.
- The extraction tube was left to stand still under room temperature (25°C) for 10 minutes.
- The solution was extracted using the mini pipette provided from the testing kit.
- The testing card was laid horizontally on a flat surface.
- 60 uL of the solution was slowly added to the sample well of the testing card.
- The testing card is left at room temperature (25°C) for 10 minutes.
- The control window is observed for any result (positive/ negative/ invalid).
Different results for the testing kit
Positive: Only the reddish-purple control line appears, indicating that the food sample is equal to or more than 20 ppb (ng/ml) AFB1 concentration.
Negative: Both the reddish-purple control line and testing line appear simultaneously, indicating that the food sample has less than 20 ppb (ng/ml) AFB1 concentration or even no AFB1.
Invalid: Only a reddish-purple testing line appears, or neither the control line nor the testing line appears.
Precautions
- The testing kit cannot be used if the package is expired or damaged.
- The testing kit should be used at room temperature.
- It must be used after unpacking to prevent it from being moist.
- Do not touch the central white surface of the testing card.
- Use a new mini pipette for extracting another sample in order to prevent contamination.
- The sample must be clear with no dross and no bacteria contamination, otherwise, it causes abnormal results, such as blockage, no obvious colour change, or affects the experimental result.
Fig. 1 The package of an AFB1 testing kit (Fender Biotech)
Fig. 2 Potato agar plate inoculated with Aspergillus flavus
Validating the testing kit
Testing kits results
Experiment 2: Testing the presence of AFB1 in food and spices samples in local markets by using the AFB1 Testing Kit
Aim
To study if food and spices from the local markets are contaminated with AFB1 (over food hygiene standards (i.e. >20ppb))
Materials and Equipments
Preparation of the food samples
Procedures for solid (liquid) food samples

Different results for the testing kit
Positive: Only the reddish-purple control line appears, indicating that the food sample is equal to or more than 20 ppb (ng/ml) AFB1 concentration.
Negative: Both the reddish-purple control line and testing line appear simultaneously, indicating that the food sample has less than 20 ppb (ng/ml) AFB1 concentration or even no AFB1.
Invalid: Only a reddish-purple testing line appears, or neither the control line nor the testing line appears.
Precautions


Testing AFB1 in local food and spices


All the samples showed a negative result of AFB1. We were glad that food samples bought from the markets do not show signs of AFB contamination.
Sample 4 and 5 were reported by The Consumer Council of Hong Kong in 2020 that they contain AFB1 contamination.

All the samples showed a negative result of AFB1. It showed that after the Consumer Council’s report, the business has done corrections to improve their food safety standard.
To study if food and spices from the local markets are contaminated with AFB1 (over food hygiene standards (i.e. >20ppb))
Materials and Equipments
- Food and spices samples purchased from different markets and stores
- AFB1 Testing Kit (Fender Biotech)
Preparation of the food samples
- 5 g of food samples are added separately into a mortar.
- The food samples are ground with the pestle and mortar into powder form.
Procedures for solid (liquid) food samples
- A spoonful of powdered food sample / 100 uL of the liquid sample is transferred to the tube containing the extraction agent with the sampling spoon provided from the testing kit.
- The tube is screwed tight and vortexed thoroughly for 1 minute.
- The extraction tube is left to stand still under room temperature (25°C) for 10 minutes.
- The supernatant of the upper layer is extracted using the mini pipette provided from the testing kit.
- The testing card is laid horizontally on a flat surface.
- 60 uL of supernatant was slowly added to the sample well of the testing card.
- The testing card is left at room temperature (25°C) for 10 minutes.
- The control window is observed for any result (Positive/ negative/ invalid).
Different results for the testing kit
Positive: Only the reddish-purple control line appears, indicating that the food sample is equal to or more than 20 ppb (ng/ml) AFB1 concentration.
Negative: Both the reddish-purple control line and testing line appear simultaneously, indicating that the food sample has less than 20 ppb (ng/ml) AFB1 concentration or even no AFB1.
Invalid: Only a reddish-purple testing line appears, or neither the control line nor the testing line appears.
Precautions
- The testing kit cannot be used if the package is expired or damaged.
- The testing kit should be used at room temperature.
- It must be used after unpacking to prevent it from being moist.
- Do not touch the central white surface of the testing card.
- Use a new mini pipette for extracting another sample in order to prevent contamination.
- The sample must be clear with no dross and no bacteria contamination, otherwise, it causes abnormal results, such as blockage, no obvious colour change, or affects the experimental result.
Fig 1. The food samples were ground with pestle and mortar to increase the extraction efficiency
Fig 2. The ground food samples were tested by the AFB1 testing kit (Fender Biotech) according to the user’s manual provided by the manufacturer
Testing AFB1 in local food and spices
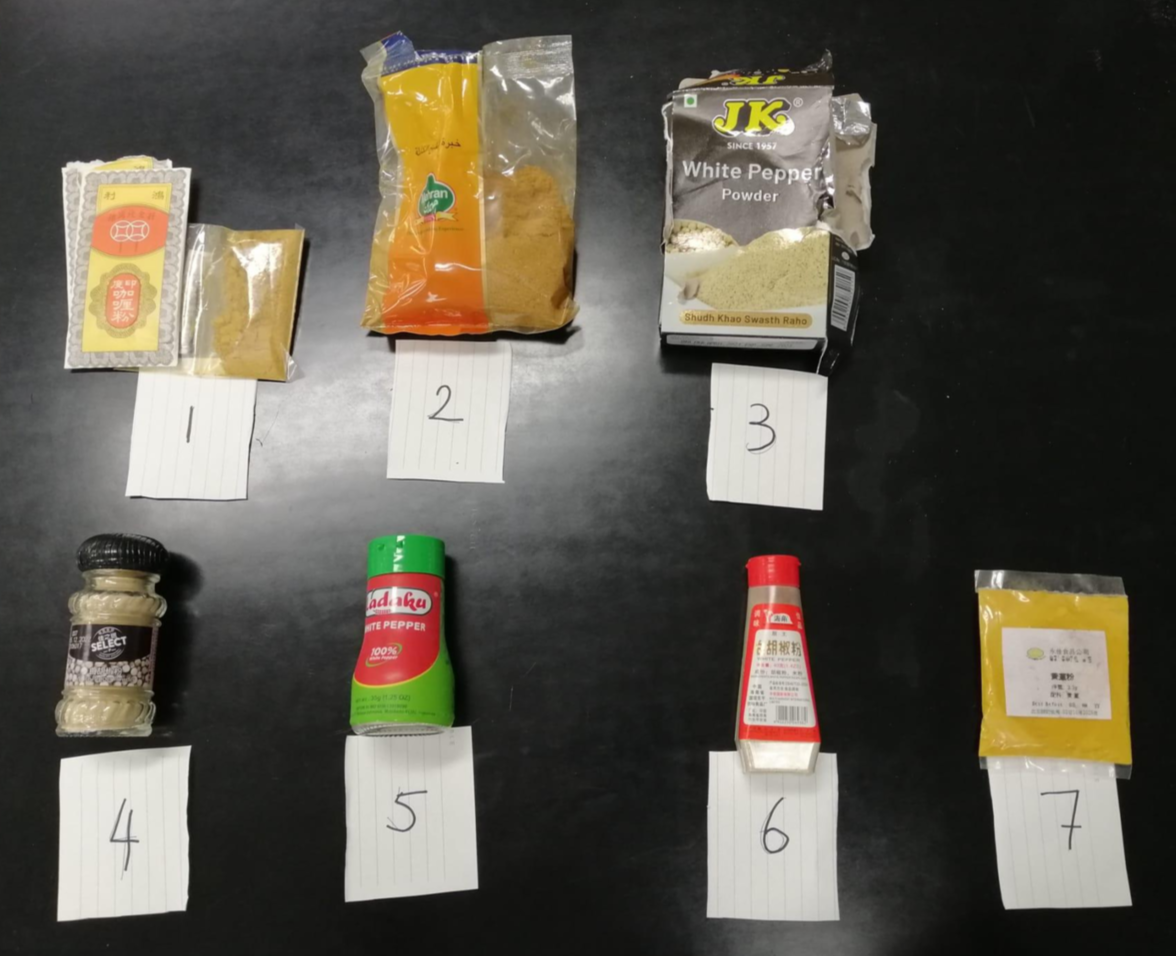
Food samples bought from local markets in Hong Kong
A: Black rice, B: Wheat, C: China Barley, D: Peanut, E: Red beans, F: Kidney Beans, G: Navy Bean, H: , I: Green Bean
A: Black rice, B: Wheat, C: China Barley, D: Peanut, E: Red beans, F: Kidney Beans, G: Navy Bean, H: , I: Green Bean
Results from AFB1 Testing
From left to right: Results of Sample A to I
From left to right: Results of Sample A to I
All the samples showed a negative result of AFB1. We were glad that food samples bought from the markets do not show signs of AFB contamination.
Spice samples bought from local markets and stores
Sample 4 and 5 were reported by The Consumer Council of Hong Kong in 2020 that they contain AFB1 contamination.
Results of AFB1 Testing in spices
All the samples showed a negative result of AFB1. It showed that after the Consumer Council’s report, the business has done corrections to improve their food safety standard.
Experiment 3: Functional assay of laccase solution to degrade AFB1
Aim
To demonstrate and study the effect of AFB1 degradation by commercially available laccase solution
Materials and Equipments
Procedure
Preparation of bacterial culture:

Validating the effect of laccase

Shown by the result, the initial A. flavus extractions showed positive results by the AFB1 testing kits. In the +laccase setup, after two hours of incubation of 9 mL laccase solution + 1 mL AFB1 extract, two strips were shown on the testing paper which means that the AFB1 concentration has been decreased to a undetectable level while the control setup still shows positive result of AFB1.
Preparation of protein cell lysate
Steps:
The bacterial culture will be harvested 4 hours after induction of protein expression by IPTG during the log phase. B-PER™ with Enzymes Bacterial Protein Extraction Kit (Thermofisher Scientific, Cat# 90078) will be used to prepare the cell lysate from the bacterial pellet. The procedure will be performed according to the manufacturer’s instructions.
Purification of His-tagged recombinant laccase / FDR-A
Steps:
The recombinant enzymes will be purified using HisPur™ Ni-NTA Magnetic Beads (Thermofisher Scientific, Cat# 88832) and 6-Tube Magnetic Separation Rack (New England BioLabs, Cat# S1506S).
The procedure will be performed according to the manufacturer’s instructions.
Bacterial culturing and expression induction
Steps:
The E. coli strains (TOP10: cloning strain and BL21: Expression strain) will be cultured by LB Broth (Invitrogen™, Cat# 12780052) and LB Agar (Lennox L agar) (Invitrogen™, Cat# 2270025).
After culturing the bacteria to optimal condition (log phase) determined by OD600, the protein expression will be induced. The expression of recombinant protein will be induced by adding IPTG (for LacO). To prepare IPTG (Invitrogen™, Cat#: AM9464) stock (1000X), 2.38 g of IPTG was dissolved in 10 mL of distilled water. The solution was filter sterilized with a 0.22μm syringe filter. The IPTG is added to the bacterial culture to the final concentration of 100 mM (0.1 M).
SDS-PAGE protein analysis
Steps:
The SDS-PAGE will be run by Mini Gel Tank System (ThermoFisher Scientific, Cat# NW0412A) with pre-casted Invitrogen 8% Bolt Bis-Tris Plus gels (ThermoFisher Scientific, Cat# NW04120BOX). The protein ladder will be SeeBlue™ Plus2 Pre-stained Protein Standard (Thermofisher Scientific, Cat# LC5925). The gel will be strained by SimplyBlue™ SafeStain (Thermofisher Scientific, Cat# LC6065).
Planned Protocol 1 Transformation Protocol
Heat Shock transformation of E. coli with laccase / FDR-A constructs
To demonstrate and study the effect of AFB1 degradation by commercially available laccase solution
Materials and Equipments
- Laccase solution (Sunson®, Cat# 12103109)
- Diluted AFB1 solution extracted from A. flavus plates
- AFB1 Testing Kit (Fender Biotech)
Procedure
Preparation of bacterial culture:
- 900 uL laccase solution was mixed with 100 uL diluted AFB 1 extraction. The control setup was 900 uL dH2O with 100 uL of AFB1 extraction.
- 60 uL of each mixture was subjected to the AFB1 testing kit, this was recorded as the initial result.
- The setups were then incubated for 2 hours.
- 60 uL of each mixture was then subjected to AFB1 testing again to see if the AFB1 concentration has been degraded to an undetectable level.
Fig 1. Commercially available laccase solution (Sunson®, Cat# 12103109)
Validating the effect of laccase
Result of laccase effect on aflatoxin B1
Shown by the result, the initial A. flavus extractions showed positive results by the AFB1 testing kits. In the +laccase setup, after two hours of incubation of 9 mL laccase solution + 1 mL AFB1 extract, two strips were shown on the testing paper which means that the AFB1 concentration has been decreased to a undetectable level while the control setup still shows positive result of AFB1.
Planned Experiments
Preparation of protein cell lysate
Steps:
The bacterial culture will be harvested 4 hours after induction of protein expression by IPTG during the log phase. B-PER™ with Enzymes Bacterial Protein Extraction Kit (Thermofisher Scientific, Cat# 90078) will be used to prepare the cell lysate from the bacterial pellet. The procedure will be performed according to the manufacturer’s instructions.
Purification of His-tagged recombinant laccase / FDR-A
Steps:
The recombinant enzymes will be purified using HisPur™ Ni-NTA Magnetic Beads (Thermofisher Scientific, Cat# 88832) and 6-Tube Magnetic Separation Rack (New England BioLabs, Cat# S1506S).
The procedure will be performed according to the manufacturer’s instructions.
Bacterial culturing and expression induction
Steps:
The E. coli strains (TOP10: cloning strain and BL21: Expression strain) will be cultured by LB Broth (Invitrogen™, Cat# 12780052) and LB Agar (Lennox L agar) (Invitrogen™, Cat# 2270025).
After culturing the bacteria to optimal condition (log phase) determined by OD600, the protein expression will be induced. The expression of recombinant protein will be induced by adding IPTG (for LacO). To prepare IPTG (Invitrogen™, Cat#: AM9464) stock (1000X), 2.38 g of IPTG was dissolved in 10 mL of distilled water. The solution was filter sterilized with a 0.22μm syringe filter. The IPTG is added to the bacterial culture to the final concentration of 100 mM (0.1 M).
SDS-PAGE protein analysis
Steps:
The SDS-PAGE will be run by Mini Gel Tank System (ThermoFisher Scientific, Cat# NW0412A) with pre-casted Invitrogen 8% Bolt Bis-Tris Plus gels (ThermoFisher Scientific, Cat# NW04120BOX). The protein ladder will be SeeBlue™ Plus2 Pre-stained Protein Standard (Thermofisher Scientific, Cat# LC5925). The gel will be strained by SimplyBlue™ SafeStain (Thermofisher Scientific, Cat# LC6065).
Planned Protocols
Planned Protocol 1 Transformation Protocol
Heat Shock transformation of E. coli with laccase / FDR-A constructs
Materials and Equipments
Procedure

Bacterial Culturing and IPTG Induction
- LB agar plate (Lennox L agar) (Invitrogen™, Cat# 2270025) with 25 ug/ml chloramphenicol (Sigma-Aldrich®, Cat# C1919-25G)
- LB Broth medium (Invitrogen™, Cat# 12780052)
- S.O.C. Medium (Invitrogen™, Cat# 15544034)
- BL21(DE3) Chemically Competent E. coli (Invitrogen™, Cat#: C600003)
- Laccase Construct / FDR-A constructs
Procedure
- The competent E. coil cells are taken out of -80°C and thawed on ice (approximately 20-30 minutes).
- Agar plates (with chloramphenicol) is taken out from storage at 4°C and incubated in a 37°C incubator.
- 1 μl of construct DNA is mixed into 50 μL of competent cells in a microcentrifuge tube. Mix gently with tube flipping.
- Incubate the cells on ice for 30 minutes.
- Transfer the tube to a 42°C heat block for 45 seconds for heat shock.
- The tube is put back on ice for 2 minutes.
- Add 1 mL of S.O.C. medium to the competent cells and put into a 37°C shaking incubator for 45 min.
- 50 μL of SOC with the transformed E. coli are plated onto the LB agar plate with chloramphenicol
- The plate containing transformed E. coli is incubated in a stationary incubator at 37°C overnight.
Bacterial Culturing and IPTG Induction
Materials and Equipments
Procedure
Planned Protocol 2 Testing if the transformed Ecoli could detoxify AFB1
Functional assay of purified enzymes to degrade AFB1
- LB Broth medium (Invitrogen™, Cat# 12780052) with 25 ug/ml chloramphenicol (Sigma-Aldrich®, Cat# C1919-25G)
- IPTG Solution (Thermo Scientific™, Cat #R1171)
Procedure
- The E. coli was inoculated into 100 mL LB broth with chlormphenicol
- Incubate bacterial culture at 37°C for 8 hr in a shaking incubator
- Add 100 uL of 100 mM IPTG to the broth to obtain a final concentration of 0.1 mM IPTG
- Wait for 4 hours
- The E. coli cells should be ready for harvest
Planned Protocol 2 Testing if the transformed Ecoli could detoxify AFB1
Functional assay of purified enzymes to degrade AFB1
Aim:
To test if the recombinant enzymes could degrade AFB1
Materials and Equipments
Procedure
To test if the recombinant enzymes could degrade AFB1
Materials and Equipments
- Purified laccase (tvLac) / FDR-A (MSMEG_5998)
- Protein lysate of transformed E. coli
- Protein lysate of non-transformed E. coli
- AFB1 Powder (Romer Labs®; Cat# 1000031)
- AFB1 Testing Kit (Fender Biotech)
Procedure
- 900 uL purified laccase and protein lysates will be mixed with 100 uL AFB1 solution with a final concentration of 30 ppb (0.03 mg/L).
- 60 uL of each mixture will be subjected to AFB1 testing kit, this will be recorded as the initial result.
- The setups will then be incubated for 2 hours, 4 hours, 12 hours, 24 hours, and 48 hours.
- At each time point, 60 uL of each setup will be subjected to AFB1 testing again to see if the AFB1 concentration has been degraded to an undetectable level.